模块
If V8 is the engine of Node.js, npm is its soul!
npm 世界最大的模块仓库,我们看几个数据:
- ~21 万模块数量
- 每天亿级模块下载量
- 每周 10 亿级的模块下周量
由此诞生了一家做 npm 包管理的公司 npmjs.com.
模块加载准备操作
严格来讲,Node 里面分以下几种模块:
- builtin module: Node 中以 c++ 形式提供的模块,如 tcp_wrap、contextify 等
- constants module: Node 中定义常量的模块,用来导出如 signal, openssl 库、文件访问权限等常量的定义。如文件访问权限中的 O_RDONLY,O_CREAT、signal 中的 SIGHUP,SIGINT 等。
- native module: Node 中以 JavaScript 形式提供的模块,如 http,https,fs 等。有些 native module 需要借助于 builtin module 实现背后的功能。如对于 native 模块 buffer , 还是需要借助 builtin node_buffer.cc 中提供的功能来实现大容量内存申请和管理,目的是能够脱离 V8 内存大小使用限制。
- 3rd-party module: 以上模块可以统称 Node 内建模块,除此之外为第三方模块,典型的如 express 模块。
builtin module 和 native module 生成过程
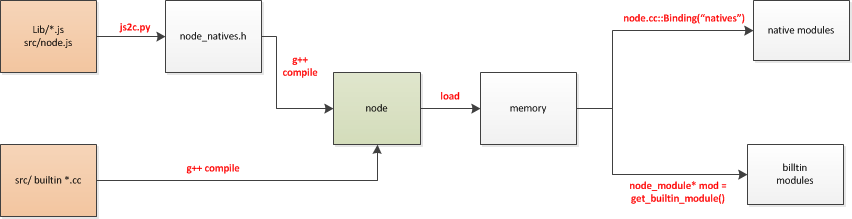 native JS module 的生成过程相对复杂一点,把 node 的源代码下载下来,自己编译后,会在 out/Release/obj/
gen 目录下生成一个文件
native JS module 的生成过程相对复杂一点,把 node 的源代码下载下来,自己编译后,会在 out/Release/obj/
gen 目录下生成一个文件 node_natives.h。
该文件由 js2c.py 生成。 js2c.py 会将 node 源代码中的 lib 目录下所有 js 文件以及 src 目录下的 node.js 文件中每一个字符转换成对应的 ASCII 码,并存放在相应的数组里面。
namespace node {
  const char node_native[] = {47, 47, 32, 67, 112 …}

const char console_native[] = {47, 47, 32, 67, 112 …}

const char buffer_native[] = {47, 47, 32, 67, 112 …}

…

}

struct _native {const char name;  const char* source;  size_t source_len;};

static const struct _native natives[] = {{ “node”, node_native, sizeof(node_native)-1 },

{“dgram”, dgram_native, sizeof(dgram_native)-1 },

{“console”, console_native, sizeof(console_native)-1 },

{“buffer”, buffer_native, sizeof(buffer_native)-1 },

…

}
builtin C++ module 生成过程较为简单。每个 builtin C++ 模块的入口,都会通过宏 NODE_MODULE_CONTEXT_AWARE_BUILTIN 扩展为一个函数。例如对于 tcp_wrap 模块而言,会被扩展为函数 static void _register_tcp_wrap (void) attribute((constructor))。熟悉 GCC 的同学会知道通过 attribute((constructor)) 修饰的函数会在 node 的 main() 函数之前被执行,也就是说,我们的 builtin C++ 模块会被 main() 函数之前被加载进 modlist_builtin 链表。modlist_builtin 是一个 struct node_module 类型的指针,以它为头,get_builtin_module() 会遍历查找我们需要的模块。
对于 node 自身提供的模块,其实无论是 native JS 模块还是 builtin C++ 模块,最终都在编译生成可执行文件时,嵌入到了 ELF 格式的二进制文件 node 里面。
- 而对这两者的提取方式却不一样。对于 JS 模块,使用 process.binding(“natives”),而对于 C++ 模块则直接用 get_builtin_module() 得到,这部分会在 1.2 节讲述。
module binding
在 node.cc 里面提供了一个函数 Binding()。当我们的应用或者 node 内建的模块调用 require() 来引用另一个模块时,背后的支撑者即是这里提到的 Binding() 函数。后面会讲述这个函数如何支撑 require() 的。这里先主要剖析这个函数。
static void Binding(const FunctionCallbackInfo<Value>& args) {
  Environment* env = Environment::GetCurrent(args);

  Local<String> module = args[0]->ToString(env->isolate());
  node::Utf8Value module_v(env->isolate(), module);

  Local<Object> cache = env->binding_cache_object();
  Local<Object> exports;

  if (cache->Has(module)) {
    exports = cache->Get(module)->ToObject(env->isolate());
    args.GetReturnValue().Set(exports);
    return;
  }

  // Append a string to process.moduleLoadList
  char buf[1024];
  snprintf(buf, sizeof(buf), "Binding %s", *module_v);

  Local<Array> modules = env->module_load_list_array();
  uint32_t l = modules->Length();
  modules->Set(l, OneByteString(env->isolate(), buf));

  node_module* mod = get_builtin_module(*module_v);
  if (mod != nullptr) {
    exports = Object::New(env->isolate());
    // Internal bindings don't have a"module" object, only exports.
    CHECK_EQ(mod->nm_register_func, nullptr);
    CHECK_NE(mod->nm_context_register_func, nullptr);
    Local<Value> unused = Undefined(env->isolate());
    // **for builtin module**
    mod->nm_context_register_func(exports, unused,
      env->context(), mod->nm_priv);
    cache->Set(module, exports);
  } else if (!strcmp(*module_v,"constants")) {
    exports = Object::New(env->isolate());
    // for constants
    DefineConstants(exports);
    cache->Set(module, exports);
  } else if (!strcmp(*module_v,"natives")) {
    exports = Object::New(env->isolate());
    // for native module
    DefineJavaScript(env, exports);
    cache->Set(module, exports);
  } else {
    char errmsg[1024];
    snprintf(errmsg,
             sizeof(errmsg),
             "No such module: %s",
             *module_v);
    return env->ThrowError(errmsg);
  }

  args.GetReturnValue().Set(exports);
}
builtin 优先级最高。对于任何一个需要绑定的模块,都会优先到 builtin 模块列表 modlist_builtin 中去查找。查找过程非常简单,直接遍历这个列表,找到模块名字相同的那个模块即可。找到这个模块后,模块的注册函数会先被执行,且将一个重要的数据 exports 返回。对于 builtin module 而言,exports object 包含了 builtin C++ 模块暴露出来的接口名以及对于的代码。例如对模块 tcp_wrap 而言,exports 包含的内容可以用如下格式表示: {“TCP”: “/function code of TCPWrap entrance/”, “TCPConnectWrap”: “/function code of TCPConnectWrap entrance/”}。
constants 模块优先级次之。node 中的常量定义通过 constants 导出。导出的 exports 格式如下: {“SIGHUP”:1, “SIGKILL”:9, “SSL_OP_ALL”: 0x80000BFFL}
对于 native module 而言,图 3 中除了数组 node_native 之外,所有的其它模块都会导出到 exports。格式如下: {“_debugger”: _debugger_native , “module”: module_native ,“config”: config_native } 其中,_debugger_native,module_native 等为数组名,或者说就是内存地址。
对比上面三类模块导出的 exports 结构会发现对于每个属性,它们的值代表着完全不同的意义。对于 builtin 模块而言,exports 的 TCP 属性值代表着函数代码入口,对于 constants 模块,SIGHUP 的属性值则代表一个数字,而对于 native 模块,_debugger 的属性值则代表内存地址(准确说应该是 .rodata 段地址)。
模块加载
我们仍旧从 var http = require('http'); 说起。
require 是怎么来的,为什么平白无故就能用呢,实际上都干了些什么?
- lib/module.js 的中有如下代码。
// Loads a module at the given file path. Returns that module's
// `exports` property.
Module.prototype.require = function(path) {
assert(path,'missing path');
assert(typeof path ==='string','path must be a string');
return Module._load(path, this);
};
首先 assert 模块进行简单的 path 变量的判断,需要传入的 path 是一个 string 类型。
// Check the cache for the requested file.
// 1. If a module already exists in the cache: return its exports object.
// 2. If the module is native: call `NativeModule.require()` with the
//    filename and return the result.
// 3. Otherwise, create a new module for the file and save it to the cache.
//    Then have it load  the file contents before returning its exports
//    object.
Module._load = function(request, parent, isMain) {
  if (parent) {
    debug('Module._load REQUEST %s parent: %s', request, parent.id);
  }

  var filename = Module._resolveFilename(request, parent);

  var cachedModule = Module._cache[filename];
  if (cachedModule) {
    return cachedModule.exports;
  }

  if (NativeModule.nonInternalExists(filename)) {
    debug('load native module %s', request);
    return NativeModule.require(filename);
  }

  var module = new Module(filename, parent);

  if (isMain) {
    process.mainModule = module;
    module.id = '.';
  }

  Module._cache[filename] = module;

  var hadException = true;

  try {
    module.load(filename);
    hadException = false;
  } finally {
      if (hadException) {
        delete Module._cache[filename];
      }
  }

  return module.exports;
};
- 如果模块在缓存中,返回它的 exports 对象。
- 如果是原生的模块,通过调用
NativeModule.require()返回结果。 - 否则,创建一个新的模块,并保存到缓存中。
让我们再深度遍历的方式查看代码到 NativeModule.require.
  NativeModule.require = function(id) {
    if (id =='native_module') {
      return NativeModule;
    }

    var cached = NativeModule.getCached(id);
    if (cached) {
      return cached.exports;
    }

    if (!NativeModule.exists(id)) {
      throw new Error('No such native module '+ id);
    }

    process.moduleLoadList.push('NativeModule' + id);

    var nativeModule = new NativeModule(id);

    nativeModule.cache();
    nativeModule.compile();

    return nativeModule.exports;
  };
我们看到,缓存的策略这个贯穿在 node 的实现中。
- 同样的,如果在 cache 中存在,则直接返回 exports 对象。
- 如果不在,则加入到
moduleLoadList数组中,创建新的 NativeModule 对象。
下面是最关键的一句
nativeModule.compile();
具体实现在 node.js 中:
NativeModule.getSource = function(id) {
  return NativeModule._source[id];
};

NativeModule.wrap = function(script) {
  return NativeModule.wrapper[0] + script + NativeModule.wrapper[1];
};

NativeModule.wrapper = ['(function (exports, require, module, __filename, __dirname) {','\n});' ];

NativeModule.prototype.compile = function() {
  var source = NativeModule.getSource(this.id);
  source = NativeModule.wrap(source);

  var fn = runInThisContext(source, {
    filename: this.filename,
    lineOffset: 0
  });
  fn(this.exports, NativeModule.require, this, this.filename);

  this.loaded = true;
};
wrap 函数将 http.js 包裹起来, 交由 runInThisContext 编译源码,返回 fn 函数, 依次将参数传入。
process
先看看 node.js 的底层 C++ 传递给 javascript 的一个变量 process,在一开始运行 node.js 时,程序会先配置好 process
Handleprocess = SetupProcessObject(argc, argv);
- 然后把 process 作为参数去调用 js 主程序 src/node.js 返回的函数,这样 process 就传递到 javascript 里了。
//node.cc

// 通过 MainSource() 获取已转化的 src/node.js 源码,并执行它

Local f_value = ExecuteString(MainSource(), IMMUTABLE_STRING(“node.js”));
// 执行 src/node.js 后获得的是一个函数,从 node.js 源码可以看出:

//node.js

//(function(process) {

//    global = this;

//    …

//})

Local f = Local::Cast(f_value);
// 创建函数执行环境,调用函数,把 process 传入

Localglobal = v8::Context::GetCurrent()->Global();

Local args[1] = {
  Local::New(process)
};

f->Call(global, 1, args);
vm
runInThisContext 又是怎么一回事呢?
  var ContextifyScript = process.binding('contextify').ContextifyScript;
  function runInThisContext(code, options) {
    var script = new ContextifyScript(code, options);
    return script.runInThisContext();
  }
- node.cc 的 Binding 中有如下调用,对模块进行注册,
mod->nm_context_register_func(exports, unused, env->context(), mod->nm_priv);
我们看下 node.h 中 mod 数据结构的定义:
struct node_module {
  int nm_version;
  unsigned int nm_flags;
  void* nm_dso_handle;
  const char* nm_filename;
  node::addon_register_func nm_register_func;
  node::addon_context_register_func nm_context_register_func;
  const char* nm_modname;
  void* nm_priv;
  struct node_module* nm_link;
};
- node.h 中还有如下宏定义,接着往下看!
#define NODE_MODULE_CONTEXT_AWARE_X(modname, regfunc, priv, flags)    \
  extern "C" {                                                        \
    static node::node_module _module =                                \
    {                                                                 \
      NODE_MODULE_VERSION,                                            \
      flags,                                                          \
      NULL,                                                           \
      __FILE__,                                                       \
      NULL,                                                           \
      (node::addon_context_register_func) (regfunc),                  \
      NODE_STRINGIFY(modname),                                        \
      priv,                                                           \
      NULL                                                            \
    };                                                                \
    NODE_C_CTOR(_register_ ## modname) {                              \
      node_module_register(&_module);                                 \
    }                                                                 \
  }

#define NODE_MODULE_CONTEXT_AWARE_BUILTIN(modname, regfunc)           \
  NODE_MODULE_CONTEXT_AWARE_X(modname, regfunc, NULL, NM_F_BUILTIN)   \
- node_contextify.cc 中有如下宏调用,终于看清楚了!结合前面几点,实际上就是把 node_module 的 nm_context_register_func 与 node::InitContextify 进行了绑定。
NODE_MODULE_CONTEXT_AWARE_BUILTIN(contextify, node::InitContextify);
我们回溯而上,通过 node_module_register(&_module);,process.binding('contextify')--> mod->nm_context_register_func(exports, unused, env->context(), mod->nm_priv); --> node::InitContextify().
这样通过 env->SetProtoMethod(script_tmpl,"runInThisContext", RunInThisContext);,绑定了『runInThisContext』 和 RunInThisContext.
runInThisContext 是将被包装后的源字符串转成可执行函数,(runInThisContext 来自 contextify 模块),runInThisContext 的作用,类似 eval,再执行这个被 eval 后的函数。
这样就成功加载了 native 模块, 标记 this.loaded = true;
总结
Node.js 通过 cache 解决无限循环引用的问题, 也是系统优化的重要手段,通过以空间换时间,使得每次加载模块变得非常高效。
在实际的业务开发中,我们从堆的角度观察 node 启动模块后,缓存了大量的模块,包括第三方的模块,有的可能只加载使用一次。笔者觉得有必要有一种模块的卸载机制 [1], 可以降低对 V8 堆内存的占用,从而提升后续垃圾回收的效率。